
Baking Bread On A Narrowboat: How It’s Done
Baking fresh bread on a narrowboat is a super satisfying experience, especially when you’re cruising down peaceful canals and want that cozy, homebaked smell wafting through your tiny kitchen. Living on a narrowboat means you get pretty used to working with a smaller space, a limited oven, and sometimes just a wood burning stove. I’ve baked dozens of loaves while afloat, so I’m sharing how it’s done, along with some tips and things that make narrowboat bread baking different from your typical home kitchen.
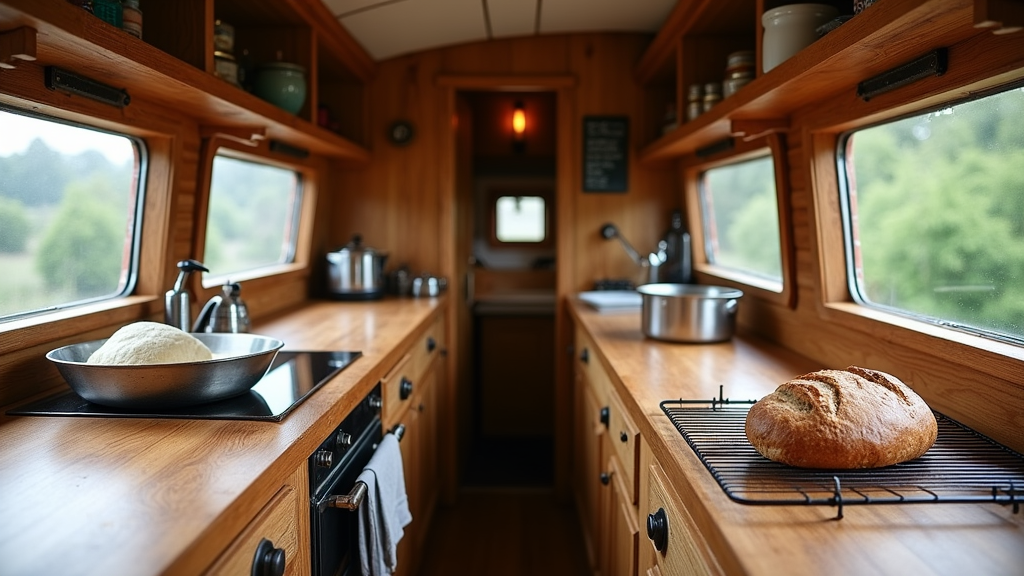
What Makes Baking Bread on a Narrowboat Unique?
Baking bread while living on a narrowboat comes with a few quirks you just don’t find in a regular house. For starters, you have to be aware of space, both for mixing the dough and for letting loaves rise. Storage is tight, and it can often get pretty humid or super chilly, depending on where you’re moored. Add in limited electricity at times, a compact oven, and the fact you’re always gently bobbing on water, and you’ve got a unique baking adventure on your hands.
Through trial and error, I’ve realised the slower pace of canal life actually helps with bread making. You get plenty of time for dough to rise, and there’s something pretty calming about kneading while the landscape drifts by outside. Sometimes, the boat’s motion even helps with a gentler rise.
Basic Equipment for Bread Baking on a Boat
I keep my galley simple, but I’ve figured out a few things that help make bread baking way smoother on board:
- Mixing Bowl: Look for one that’s deep but not too wide so you can mix easily without flour flying everywhere. I use a sturdy metal bowl since it’s lightweight and stands up to being knocked around.
- Measuring Cups and Spoons: Precision is key, especially in a tiny kitchen. I stash a compact set in the smallest drawer.
- Wooden Spoon or Dough Scraper: A dough scraper is handy for cleaning up sticky surfaces and getting every bit of dough out.
- Proofing Basket or Bowl: Sometimes I just use a floured tea towel inside a small bowl when space is tight.
- Baking Tin or Dutch Oven: Something that fits inside your boat’s oven or stove. Some boaters use cast iron pans on a woodburner too, which gives a killer crust.
- Thermometer: Super useful if your boat oven runs hot or cold. Keeps bread from being undercooked in the middle.
Even with minimal gadgetry, it’s totally possible to get that artisan style loaf. If you have more space, a small rolling pin can be handy for shaping flatbreads, and having an extra tea towel set aside just for covering dough comes in handy too.
Step-by-Step Guide to Baking Bread on a Narrowboat
If you’re used to baking bread at home, things aren’t wildly different, but some tweaks help when you’re on the water. Here’s how I do it:
- Gather Ingredients: I keep things unfussy—strong bread flour, yeast (dried or fresh), salt, water. Sometimes a touch of oil or honey for softer bread, or you can add in sunflower seeds or oats for a bit of texture.
- Mix and Knead: Use the mixing bowl to combine flour and salt first, then yeast, and finally water. If your galley counter space is tiny, knead right in the bowl or on a chopping board. Ten minutes of kneading usually does the trick, but don’t be afraid to let it rest for a couple minutes if your arms get tired.
- First Rise: The cabin can get cozy warm if the stove’s on. Dough rises faster near a heat source. If it’s cold, wrap the bowl in a thick towel or let it rise tucked near the engine bay. Just make sure it’s not too hot or you’ll kill the yeast. Even during chilly winter months, dough will eventually rise if you give it enough time. Patience pays off on a boat.
- Shape and Proof: Knock the dough back and shape it. Let it proof in your tin or basket, usually for about an hour. I put it near a porthole to keep an eye on the scenery, and sometimes even cover it loosely with a damp cloth to keep the top from drying out if the air is especially dry inside.
- Bake: Baking times depend on your oven. Many narrowboat ovens run hotter at the back, so rotate halfway through. My trick is to preheat well and throw in a bit of water onto a hot tray at the start for extra steam and a crusty finish. If using a woodburner, make sure to monitor the heat closely; bread can burn pretty fast. If you can fit a small Dutch oven or covered pot, bake the loaf with the lid on first, then remove for the last 10 minutes for a richer crust.
- Cool: Let your bread cool on a rack or prop it against a tea towel. The boat air is usually dry enough to avoid a soggy loaf, unless it’s proper rainy season. Slicing too soon can result in a gummy texture, so give it time.
I find this process works with most basic recipes, and the hands-on aspect fits really well with life afloat. Sometimes, if there’s extra dough, I shape rolls for quick snacks or mini sandwiches, which people always appreciate when cruising on a busy day.
Troubleshooting Common Narrowboat Bread Baking Problems
I’ve hit my fair share of boat-specific bread fails. Here’s how I manage the most frequent issues:
- Bread Not Rising: Check your yeast and try to find the warmest spot on the boat. If all else fails, longer rising time often helps, even if it takes a couple of extra hours. Sometimes adding a bit more yeast or using a starter you’ve kept in the fridge helps.
- Dense or Gummy Bread: This can happen if the oven temp is off or if there’s too much humidity in the boat. Make sure to check oven temperature with a thermometer, and give the bread a few more minutes with the door slightly open at the end to help dry out the loaf. Sifting the flour before mixing sometimes lightens the result.
- Uneven Crust: Rotating the loaf halfway through helps, since narrowboat ovens often have hot and cool spots.
- Burnt Bottom: Try putting a baking tray beneath the tin, or use a double tray method. This shields the bottom from direct heat and can keep the edges from catching too soon.
While it’s not always picture perfect, these small tweaks usually lead to decent bread every time. If your first loaf isn’t great, try again—there’s always something to learn from each bake!
Types of Bread That Work Well on a Narrowboat
I stick to reliable, forgiving recipes because narrowboat life isn’t about fancy stuff with loads of steps. Here are a few I keep coming back to:
- No knead Bread: This recipe is pretty forgiving if you get distracted, or if the kettle whistles and throws off your schedule. Mix the dough, let it rise overnight, then bake as usual. You’ll get a crunchy crust and chewy crumb every time.
- Simple White Loaf: Classic, soft, and goes with just about anything. Proving in a tin helps keep the shape if your galley is warm and humid. It’s easy to slice and makes the perfect toast.
- Soda Bread: Super quick since it uses baking soda instead of yeast. Perfect for days when you’re low on supplies and craving bread on the fly. You can mix in seeds or bits of cheese for extra flavor
- Flatbreads or Naan: These are quick to fry on the stovetop if turning on the oven feels like too much effort. They’re great with curry leftovers or even as a base for canal-style pizzas.
Bread mixes from shops also work well in a pinch, and they’re easy to store in bulk if you have the space. There’s even room to experiment with rye or wholegrain breads; they tend to rise a little slower but are heartier for longer trips.
Managing Ingredients and Water Quality
Storage can be a challenge on a boat with limited pantry space. I usually keep a tightly sealed bin for flour to keep out moisture and pests. Yeast, especially dried, lasts longest in a cool, dark spot. As for water, I use filtered boat tank water when possible, but if you’re on the move and haven’t refilled in a while, bottled water is a solid backup for baking. Getting the water quality right really makes a difference in the final loaf’s texture.
Salt and extras like seeds, oats, or dried fruit are great to have in small jars. You’ll want things you can grab fast without having to dig through bins, especially if the boat is rocking a bit. If storage is extremely limited, I portion ingredients into zip locked bags before longer cruises. It makes baking smoother on days when you want bread but don’t feel like reorganising your cupboards.
Tips for Success: What I’ve Learned Baking on Board
I’ve picked up a few tips after plenty of loaves, good and bad:
- Be patient. Bread making naturally fits with canal life, where you’re never really in a rush.
- Clean up as you go. Dough dries fast, and space fills up even quicker in a narrowboat kitchen.
- Adjust recipes for your oven. Most boat ovens run a bit different from standard ones. Lowering the temperature by ten degrees and checking early saved me more than once.
- Embrace imperfection. Not every loaf looks bakery ready, and that’s totally fine. Homemade bread on the boat always tastes pretty good, even when it’s a bit lopsided.
Sharing bread with fellow boaters or friends on the towpath always brings about new baking ideas; it’s a handy way to get feedback and swap stories. Sometimes people bring their own recipes and you can compare notes, making for a great afternoon on board.
Bread Baking FAQs for Narrow boaters
Here are questions people ask me most about boat bread:
Question: Can I bake bread on a wood burning stove?
Answer: Yes, lots of folks do! Just set a lidded pot directly on the stove, monitor the heat, and rotate for even cooking. It’s a trial-and-error thing, but doable with some practice. Some people even build small racks to fit on the stove, so you can try baking rolls or small flatbreads right on top.
Question: Do I need special recipes for baking bread on a narrowboat?
Answer: Not really, but stick with easy recipes that don’t rely on special equipment or loads of mixins. Bread that’s forgiving and simple works best, especially while you’re learning how your boat oven works.
Question: How can I store homemade bread on a boat?
Answer: I wrap it in a cotton cloth or pop it in a bread tin. Try to eat it within a couple of days, since moisture on a boat sometimes makes bread go stale quicker. If you have leftovers, they make wonderful toast or breadcrumbs.
Why Baking Bread Feels Right on the Cut
Getting into baking bread on a narrowboat isn’t just about filling the galley with good smells; it’s a way to connect with life on the waterways and the slow pace that comes with cruising. It’s cheaper than picking up loaves at every lock stop, and you get the bonus of creating something from scratch in a setting that’s peaceful and a bit adventurous. Plus, you never know who you’ll meet along the way who might share their own baking tips or even swap a loaf or two. Next time you hear that gentle lapping of water and have a day on board, it’s worth giving bread baking a try, even if the first loaf turns out a little wonky. That’s all part of the fun, and every loaf you pull from your oven or stove carries a little taste of boat life adventure